Skinny(er) Scalloped Potatoes

Skinny(er) Scalloped Potatoes - sweetheatchefs.com

INGREDIENTS

Non stick cooking spray
10 medium peeled Yukon Gold potatoes, sliced thinly. I used my food processor attachment at 2mm
2.5 tbsp butter
salt and fresh pepper to taste
1 clove of garlic, or if you are a garlic lover (like me) 2 cloves minced or microplaned (if you don’t have cloves, 1/2-1 tsp garlic powder)
1 cup shredded reduced fat Cheddar or Gruye cheese or a combo of both
1/4 cup large grate parmesan cheese
2 cup fat-free milk
1 bay leaf
pinch freshly grated nutmeg
3 tsp thyme
2 tsp dijon mustard
1 green onion, thinly sliced for garnish
 
 
sweetheatchefs.com
DIRECTIONS

  1. Preheat oven to 425°F. Spray a 9″x 13″ baking dish with cooking spray.
  2. In a large bowl add potatoes, salt, & fresh cracked pepper. Toss well so everything is coated.
  3. The placement of the potatoes will happen in 4 different batches. First batch take 1/4 of the potatoes and layer them on the bottom of the pan.
  4. Add 1/4 of the cheese on top, repeat until all potatoes and cheese are in pan.
  5. In a small saucepan, bring milk, butter, dijon mustard, thyme, bay leaf and nutmeg to a boil over medium heat stirring very frequently so it does not scaldpour over potatoes (remove bay leaf)
  6. Top with the Parmesan cheese and green onions.
  7. Bake uncovered, for 40 – 50 minutes (depending on how thick your potatoes were) or until potatoes are tender. 

sweetheatchefs.com

Manic Monday Button

Rosemary & Garlic Infused Oil

Rosemary & Garlic Infused Oil - sweetheatchefs.com

THINGS YOU NEED

Vegetable Oil or Olive Oil

Rosemary Sprigs, washed and thoroughly dried

Garlic Cloves, peeled and sliced in half lengthwise

Cleaned and thoroughly dried glass bottles in various sizes shapes and designs

Stoppers; corks, wine bottle stoppers etc.

IMG_4125

DIRECTIONS:

Process takes 1 week to infuse, keep that in mind when planning for your gift or for yourself.

  1. In a glass bottle, place 1 Rosemary sprig and 1 half of garlic clove.
  2. Using a funnel add oil until almost to the top so as not to overflow.
  3. Add cork on top.
  4. Place in a safe, cool environment for 1 week. Everyday swirl the bottle around to mix up the contents. Do not tip upside down it might leak.
  5. After 1 week, dump oil into a bowl to remove Rosemary and garlic.
  6. Replace back in bottle with stopper. 
  7. Refrigerate for longevity. Lasts 2 weeks, if you opt to keep in rosemary and garlic, 1 week. 

IMG_4138

You can change up the ingredients to your tastes. I use these two ingredients all the time so this is my favorite. This makes a nice gift for Grandparents, Parents, Bosses, Mother’s Day, Father’s Day, Christmas, Hostess Gift, & Housewarming. Use for making salad dressings, pan frying chicken, fish, shrimp, beef, pork, & lamb.

IMG_4120

OTHER HERBS TO USE:

  • Thyme
  • Oregano
  • Whole Dried Chili Peppers
  • Dried Chili Pepper Flakes
  • Fresh Sage Leaves (another fav!!)
  • Lemon Peelings + zest
  • Lime Peelings + zest
  • Whole Peppercorns

When choosing herbs and combinations of them, (especially the spicy ones) make sure to start off with small quantities and add to it from there. As you can see in the original recipe I only use small quantities. Fresh herbs are very powerful and infuse the oil very well. 

This recipe is beign shared over at Foodie Friends Friday

Cranberry Rosemary Dip – EASY & QUICK


INGREDIENTS

  • 10 ounces cream cheese, softened
  • 3/4 teaspoon garlic powder
  • 6 tablespoons dried sweetened cranberries ( I course chop them, but you could leave them whole)
  • 4 teaspoons chopped fresh rosemary ( I used the spice grinder)
  • fresh cracked pepper and kosher salt (to taste)

Place all ingredients in bowl and using a spoon smooth, smash and stir together all ingredients until well combined. Taste it with a cracker and see if you want to add more of any of the ingredients! Place back in refrigerator covered for about 1 hour before serving with crackers. Garnish with a few whole cranberries and a sprig of Rosemary. Super easy, beautiful in color and a HUGE hit! Enjoy 😀


Homemade Breadcrumbs – Because it’s too easy not to!

You know those pesky ends to the bread no one eats? Or when you have a toddler who is on a kick of I won’t eat the crust on my sammich!? What a better way to make use of those left overs is to make them into bread crumbs. Throughout the month I toss ends and left over bread scraps into a bag in the freezer and once a month I get out the food processor and the frozen bread and go to town for the morning making bread crumbs. I freeze them so they don’t get moldy before I am ready to use them. You can make plain ones or seasoned ones just like you can buy in the store. But the best part is you make them with natural ingredients and they types of herbs and seasonings YOU like. You are not limited to what is supplied in the supermarket. This could not be a simpler project to take on, in fact my 2 year old loves to whirl the food processor in what he thinks is his all acclaimed part of helping in the kitchen 😀

INGREDIENTS:

  • Left over bread ends, scraps, hot dog buns, hamburger buns, whatever bread product you have that you won’t use.

DIRECTIONS:

  1. Pre-heat oven to  375 degrees F.
  2. In a food processor tear up bread and pulverize until consistency you like for bread crumbs. I generally use a medium to smaller consistency. 
  3. Line a sheet pan with foil and toss about 2 cups worth of the mixture (which for me is 1 container full from the food processor) onto the sheet pan.
  4. Bake for   12 – 15 minutes.
  5. Watch it your first time to make sure they don’t over cook. I have made extra crispy ones and the flavor was not all that great. 
  6. Halfway through the baking process I toss and break up the bread crumbs to ensure a nice even browning.


ITALIAN SEASONED INGREDIENTS:

  • 2 teaspoons dried ground thyme
  • 2 teaspoons garlic powder
  • 1 teaspoon dried ground oregano
  • 1 teaspoon dried ground basil
  • 1 teaspoon crushed red pepper flakes (or to taste)

ITALIAN SEASONED DIRECTIONS:

Follow the steps above for the plain crumbs, except before placing in the oven toss with the ingredients above.

You can create whatever seasoning suits you. I make a lot of Italian food, so this is my go to mix.

Store in an airtight container or zip lock bag in freezer for several months.

Fake Out Parmesan & Rosemary Biscuits

These are the best quick go to fake out biscuits you can have. You have a dinner for some guests and you’re in a hurry, these taste like you made them home-made and they are super quick. TIP: Get rid of the packaging and you can claim them as your own! the crunchy rosemary and its earthy flavor mixed with the freshly grated parmesan with its nutty sharp flavor all go together so well. You won’t even need butter on these!

INGREDIENTS

1 can Pillsbury biscuit dough (any kind)
2-3 sprigs rosemary
1/2 cup fresh grates Parmesan cheese
1 teaspoon garlic powder

Pre-heat oven to 325 degrees F. and cook biscuits for 15-18 minutes or until golden brown. Place biscuits on a foil lined cookie sheet. Sprinkle with parmesan cheese, and cut 1 leaf of the rosemary on top. Sprinkle with garlic powder. Take 1 whole leaf of rosemary and place in the middle of biscuit. Repeat until all biscuits are done.

Walking Tacos

Adapted from the Picky Palatea great site that helped me get through prepping for my camping trip not only on food ideas, but camping with a toddler ACK! So after our camping trip I now know these walking tacos are terrific. Making sure to make what you can at home first really makes the prepping at the camp site easy peasy! This version is for at home eating, if you want the actual camping version click here.

INGREDIENTS

2 Tablespoons extra virgin olive oil
2 shallots, chopped
2 orange bell peppers, diced
4 cloves fresh garlic, minced
2.5 lb lean ground turkey
Pinch of kosher salt and black pepper
1 can organic tomato sauce
1 can diced tomatoes and green chilis
1 cup of your favorite salsa
2 cans of beans, drained. I used black and red kidney
1 can black olives sliced
3 Tablespoons chili powder
1.5 Tablespoon ground cumin
1 Tablespoon hot sauce
Juice from 1 lime
1/2 cup fresh chopped cilantro
1/4 cup masa harina
water for masa harina
6 Bags or cans of Fritos chips
1 bag shredded cheddar cheese, mexican blend
Sour cream
Jalapenos and/or green onions
1 lime cut in wedges

DIRECTIONS

  1. Heat oil in a large pot or dutch oven over medium heat.
  2. Saute onion, garlic and peppers for 5 minutes or until softened.
  3. Add ground turkey, salt and pepper. Cook until browned.
  4. Pour in tomato sauce, tomatoes, salsa, and stir to combine.
  5. Add in beans, olives, chili powder, cumin, hot sauce, lime juice, salt, pepper as needed.
  6. In a small bowl add masa harina and water mixing with a whisk until a thin consistency. 
  7. Add masa mixture to meat and stir to combine.
  8. Add chopped cilantro and reduce heat to low to simmer until ready to serve.
  9. Place frito chips on plate and add chili, cheese, squeeze lime over top, dollop the sour cream, add sliced jalapenos and cilantro and dig in! Perfect for game day with a COLD ONE!!

Cooking is a messy job and always remember….

DON’T WEAR WHITE SHIRTS when preparing tomato based sauces!!!


These walking tacos are part of the Foodie Friends Friday page!

Walking Tacos, Camping Style

No one wants to spend their time camping making food. The easier the better, with less mess and little prep. These walking tacos are just the thing every time! I will never go camping without taking these with us. Make sure you do all the prep work ahead of time at home, you will be so happy you did.

This version was adapted from the Picky Palatea great site that helped me get through prepping for our camping trip not only with food ideas, but camping with a toddler (ACK!)   This recipe is for camping, if you want the at home version click here. Yes you can make this on game day at home and eat tacos on the couch without the mess!

INGREDIENTS

2 Tablespoons extra virgin olive oil
2 shallots, chopped
2 orange bell peppers, diced
4 cloves fresh garlic, minced
2.5 lb lean ground turkey
Pinch of kosher salt and black pepper
1 can organic tomato sauce
1 can diced tomatoes and green chilis
1 cup of your favorite salsa
2 cans of beans, drained. I used black and red kidney
1 can black olives sliced
3 Tablespoons chili powder
1.5 Tablespoon ground cumin
1 Tablespoon hot sauce
Juice from 1 lime
1/2 cup fresh chopped cilantro
1/4 cup masa harina
water for masa harina
6 Bags or cans of Fritos chips
1 bag shredded cheddar cheese, mexican blend
Sour cream
Jalapenos and/or green onions
1 lime cut in wedges

DIRECTIONS

  1. The day before camping get this made and put in a ziplock baggie, you will have a much funner and easy time cooking dinner. It takes about 5 minutes to get everything together at the camp ground!
  2. Heat oil in a large pot or dutch oven over medium heat.
  3. Saute onion, garlic and peppers for 5 minutes or until softened.
  4. Add ground turkey, salt and pepper. Cook until browned.
  5. Pour in tomato sauce, tomatoes, salsa, and stir to combine.
  6. Add in beans, olives, chili powder, cumin, hot sauce, lime juice, salt, pepper as needed.
  7. In a small bowl add masa harina and water mixing with a whisk until a thin consistency such as pancake batter.
  8. Add masa mixture to meat and stir to combine.
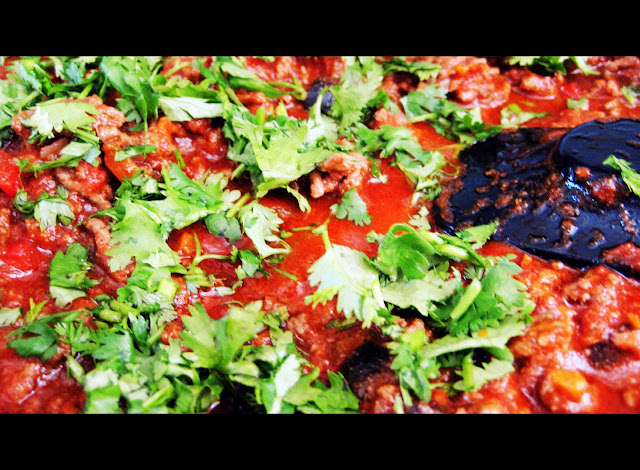
  9. Add chopped cilantro and reduce heat to low and simmer for about 30-40 minutes.
  10. Take off stove and let cool. Once cool place in ziplock baggie and refrigerate until ready to serve.
  11. when you are ready to serve, place chili in pot and heat up to desired temperature.
  12. Open bag of fritos or can and add cheese. If using the can fritos close can with lid and shake until cheese starts to melt. If using the bag, stir the cheese until it starts to melt.
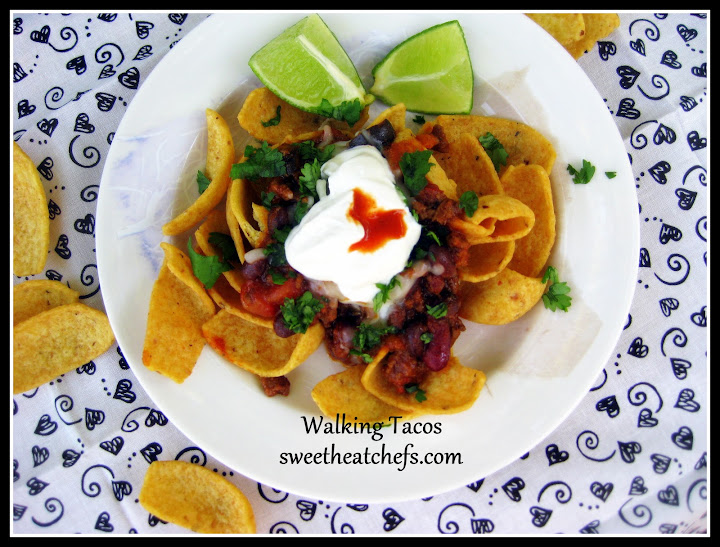
  13. Next add the lime juice, dollop on sour cream, sliced jalapenos or green onion and top with cilantro and dig in!
  14. All you have for clean up is the pan you reheated the chili in!

TO MAKE AT HOME:

Could these legumes be any prettier? I could eat them just like this with a spoon! such a nutritional food for us, especially kids to help fill their bellies!

WHEN YOU GET TO THE CAMPSITE AND ARE READY TO EAT:

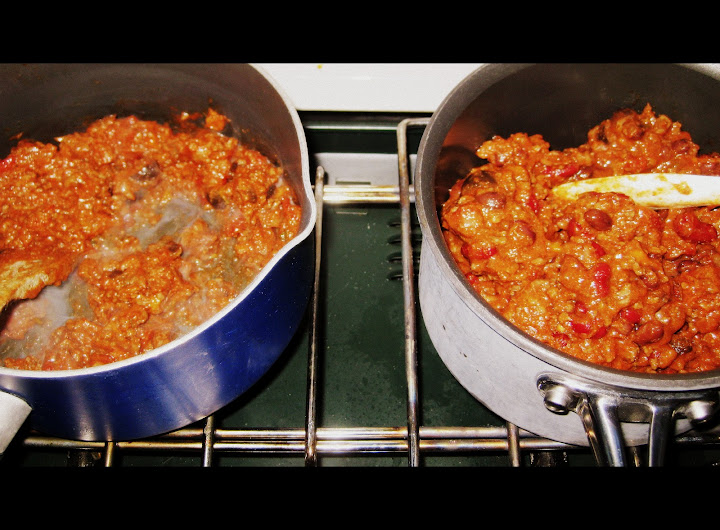
Camping stove with 2 pots of chili mixture, 1 without beans on left 1 with beans on right

I was lucky enough to find these cool cans of fritos. They were a little TOO full, so we pulled some chips out before adding the taco mixture. These cans rock because you can put a lid on and shake up the ingredients, or if your kids are fanatics about bugs, they can close it while they take a drink or whatever so nothing accidentally makes its way into the food 😀

Chili/Taco mixture added into frito cans

I ALWAYS say…DON’T FORGET MY LIME!!!

Lovely cilantro and sour cream to top it all off

Shake Shake Shake…

Here is proof it is GOOD! 

56

Roasted Cauliflower

First off, I can’t take credit for this recipe. I got it from Rachael Ray. It is the BEST cauliflower recipe ever! My kids don’t eat or like cauliflower for that matter or any veggies really and we eat the entire head of cauliflower with this recipe! I am at the point now that I automatically get 2 heads of cauliflower when I make this. (YES it’s that good!)

INGREDIENTS

4 cloves garlic, halved
About 1/3 cup extra virgin olive oil (EVOO)
1 head cauliflower, cut into florets (the smaller the better)
Juice of 1/2 lemon
2 tablespoons fresh thyme
Salt and pepper
1/2 cup grated Parmigiano Reggiano cheese (must get this cheese, you can substitute, but this is the best!)

Parmigiano-Reggiano cheese, the true "par...

Parmigiano-Reggiano cheese, the true “parmesan” (Photo credit: Wikipedia)

DIRECTIONS

  1. Pre-heat the oven to 400°F. 
  2. In a small pot, combine the garlic and EVOO; heat over a low flame and gently simmer until the garlic is light golden brown in color and very fragrant, about 10-15 minutes. Remove the garlic cloves and reserve.
  3. Pile the cauliflower on a baking sheet and dress with the lemon juice, about 3-4 tablespoons of the garlic-infused oil, thyme, and salt/pepper. 
  4. Toss to combine and spread the florets out in a single layer. Roast to brown at the edges and until tender, 20-25 minutes. 
  5. Cover with the grated Parmigiano Reggiano and roast for 5 minutes more. 
  6. Serve warm if you can manage to keep from eating straight off the pan (this is what m and my hubby end up doing!)
  7. Those garlic cloves you used to season the olive oil are great in mashed potatoes, potato salad, or mixed up in anything you can think of!


Chipotle Ranch Sauce

Chipotle, Chipotle, Chipotle, do I have your attention? Ok, good! chipotle is my new favorite ingredient along with garlic. I try to add it to anything I can without my kids getting too angry. Here is my recipe…

INGREDIENTS

1 8 oz. canning jar with lid
1/3 cup low fat mayonnaise, no one will notice
1/2 cup low fat milk 2% or low fat sour cream, plain whole greek yogurt or buttermilk if you want a thicker sauce
1 large clove garlic or two small, minced
1 tbsp minced fresh dill 
1 tbsp minced fresh parsley 
1/2 tsp salt
1 chipotle pepper + 1 teaspoon of the adobo sauce (IF you like spicy, add more but taste test as you go so it isn’t TOO spicy!)
freshly cracked pepper, to taste

DIRECTIONS

Add all ingredients to the canning jar, close lid tightly and SHAKE SHAKE SHAKE…SHAKE SHAKE SHAKE… SHAKE YOUR BOOTY! (Remember that song?) Chill for a good 30-40 minutes for best tasting results.

Honey Glazed Chicken Bites

My “honey” and I love Chinese food. Specifically orange chicken or sweet & sour chicken. It takes a toll on your pocketbook if you are buying for a large family, not to mention who knows what they put into it. We decided to buy bulk at our local >cough< warehouse spot. I say cough, because these days people have been talking negatively about them. We need these Costco‘s in our life right now, so we shop there and love it. Anyway they have this really nummy orange chicken, but it simply, again, isn’t enough for us all, yes even at Costco there is something NOT big enough for us :D. I decided to try my hand at recreating something at home that would satisfy the craving, but with a twist. (1) Using something sweet for the sauce & (2) not making it spicy so my younger kids would eat it. You will love the texture of this batter as it is really light and delicate, unlike a traditional deep-fried, well, anything really. You can eat it plain or add the honey sauce.

Chicken needs to marinate for about 30-45 minutes

Fry chicken in batches so you don’t overcrowd pan and to keep oil temperature the same

Making the honey sauce

Toasting sesame seeds

INGREDIENTS

1 ½ lbs boneless skinless chicken breasts cut into 1” chunks
Vegetable Oil for deep-frying

BATTER INGREDIENTS
4 tablespoons cornstarch
¼ cup flour
1 teaspoon baking powder
½ cup water
½ teaspoon salt
1 egg
1 egg white
SAUCE INGREDIENTS
1 ½ tablespoons coconut oil

2 teaspoon ginger, minced
3 cloves garlic, minced
1 teaspoon salt
4 tablespoons honey
1 tablespoon rice wine vinegar
½ cup water
1 teaspoon cornstarch, mixed with 1 teaspoon water
Handful of toasted sesame seeds (optional)

DIRECTIONS

  1. Mix all batter ingredients together until combined then add chicken and stir to coat all chicken, cover and marinate for 30-45 minutes in refrigerator.
  2. Heat deep fryer or large pot of vegetable oil to 350 degrees F.
  3. Once oil is ready, fry chicken in batches to maintain oil temperature and avoid overcrowding. Chicken bites should cook about 5 minutes to completion. Drain on a paper towel. Continue until chicken is all cooked.

Sauce:

  1. Add coconut oil, ginger and garlic to fry pan or wok and heat for about 3 minutes until aromatic.
  2. Add salt, honey, vinegar, and water and mix well.
  3. Combine 1 teaspoon of water with 1 teaspoon of cornstarch and add to the sauce.
  4. Simmer for about 5 minutes and sauce has thickened. Add sesame seeds on top if using.
  5. Serve over the top of my Coconut Rice.