Cranberry Rosemary Dip – EASY & QUICK


INGREDIENTS

  • 10 ounces cream cheese, softened
  • 3/4 teaspoon garlic powder
  • 6 tablespoons dried sweetened cranberries ( I course chop them, but you could leave them whole)
  • 4 teaspoons chopped fresh rosemary ( I used the spice grinder)
  • fresh cracked pepper and kosher salt (to taste)

Place all ingredients in bowl and using a spoon smooth, smash and stir together all ingredients until well combined. Taste it with a cracker and see if you want to add more of any of the ingredients! Place back in refrigerator covered for about 1 hour before serving with crackers. Garnish with a few whole cranberries and a sprig of Rosemary. Super easy, beautiful in color and a HUGE hit! Enjoy 😀


Cranberry Swirl Cheesecake – Perfect for the holidays!

Have a holly jolly Christmas, it’s the best time of the year….Oh sorry I have these Christmas jingles in my head  this time of year and yes I know it isn’t even Thanksgiving yet. 😀  I’m hopeless when this time of year comes around! Just imagine your friends and families face when you break out this beauty for desert! I think this is truly one of the best cheesecakes I have ever had.

As you know I am not the best baker around, so when I make a cheesecake that comes out looking at gorgeous as this one..I am a happy camper! You know what it means? It means YOU can do this too!! LOL

My mom gave me a ton of fresh cranberries and I was trying to figure out what the heck to do with them, when of course cheesecake comes to mind. The cinnamony chocolatey graham cracker crust paired with the creamy cheesecake and tartness of cranberries is like a bite of heaven in each mouthful. The cranberry compote is a MUST to save even after the cheesecake is gone. It is great on crackers with a sharp cheddar cheese or to add into your mixed cocktails! YUM

Cranberry Compote:

  • 2 cups of fresh or frozen cranberries
  • 2/3 cup granulated white sugar
  • 2/3 cup orange juice
  • 1/4 tsp nutmeg, ground
  • 1/2 tsp cinnamon, ground
  • zest of one lemon or orange
  • 4 tsp vanilla

Graham Cracker Crust:

  • 2 3/4 cups of graham crackers
  • 1 tsp cinnamon
  • 1 tablespoon unsweetened Cocoa powder
  • 2 tablespoons granulated white sugar
  • 1/2 cup unsalted butter, melted

Cheesecake Filling:

  • 4 – 8 ounces packages cream cheese, room temperature (I used 2 full fat and 2 reduced fat cream cheese and this is crazy rich)
  • 1 cup granulated white sugar
  • 1 cup sour cream
  • 1/2 cup whipping cream or half and half
  • 1 tablespoon vanilla
  • 4 large eggs, room temperature
  • 1 tsp pure vanilla extract
  • cranberry compote

Make cranberry compote:
Combine all ingredients except vanilla in large saucepan. Cook over medium high heat until mixture thickens, stirring occasionally, about 5-10 minutes. Cool slightly. Transfer to food processor and add vanilla. Puree until smooth. Strain into a bowl and cover  Refrigerate at least 6 hours or freeze for 3.

Make crust:
Spray 10-inch-diameter Springform pan (I used 2 pie dishes) with nonstick spray. If using a Springform pan, wrap outside of pan with 2 layers of heavy-duty foil. Blend all ingredients except butter in food processor. Add butter; blend until moist clumps form. Press crumb mixture onto bottom and up sides of pan. Chill crust while preparing filling.

Make filling:
Position rack in center of oven and preheat to 350°F. Using electric mixer, beat cream cheese in large bowl until fluffy. Beat in sugar. Beat in eggs 1 at a time. Mix in sour cream, half and half and vanilla.

Transfer 1/3 of filling to prepared crust. Dollop 1/3 of cranberry puree atop filling. Repeat layering of filling and puree 2 more times. Using knife, skewer or toothpick, swirl puree through filling, creating marbled design.

Place springform pan or pie dish in large baking dish or roasting pan. Pour enough hot water into roasting pan or baking dish to come halfway up sides of springform pan or pie dish. Bake until cheesecake puffs around edges, about 1 hour 15 minutes. Turn off oven. Let cake stand in oven 1 hour, leaving oven door ajar.

If using  springform pan: Transfer cake to rack. Run knife around pan sides to loosen cake. Cool completely. Remove foil from pan sides. Cover cake and chill overnight. (Can be made 2 days ahead. Keep refrigerated.) Remove pan sides.

If using a pie dish: Cover with plastic wrap and place in refrigerator for 6 hours or 3 hours in freezer.

Serve cake with Cranberry Compote either on top or on the side for dipping each tart bite into!

This recipe is was shared over at:

Thursday’s Treasures

Wicked Good Wednesdays

Homemade Breadcrumbs – Because it’s too easy not to!

You know those pesky ends to the bread no one eats? Or when you have a toddler who is on a kick of I won’t eat the crust on my sammich!? What a better way to make use of those left overs is to make them into bread crumbs. Throughout the month I toss ends and left over bread scraps into a bag in the freezer and once a month I get out the food processor and the frozen bread and go to town for the morning making bread crumbs. I freeze them so they don’t get moldy before I am ready to use them. You can make plain ones or seasoned ones just like you can buy in the store. But the best part is you make them with natural ingredients and they types of herbs and seasonings YOU like. You are not limited to what is supplied in the supermarket. This could not be a simpler project to take on, in fact my 2 year old loves to whirl the food processor in what he thinks is his all acclaimed part of helping in the kitchen 😀

INGREDIENTS:

  • Left over bread ends, scraps, hot dog buns, hamburger buns, whatever bread product you have that you won’t use.

DIRECTIONS:

  1. Pre-heat oven to  375 degrees F.
  2. In a food processor tear up bread and pulverize until consistency you like for bread crumbs. I generally use a medium to smaller consistency. 
  3. Line a sheet pan with foil and toss about 2 cups worth of the mixture (which for me is 1 container full from the food processor) onto the sheet pan.
  4. Bake for   12 – 15 minutes.
  5. Watch it your first time to make sure they don’t over cook. I have made extra crispy ones and the flavor was not all that great. 
  6. Halfway through the baking process I toss and break up the bread crumbs to ensure a nice even browning.


ITALIAN SEASONED INGREDIENTS:

  • 2 teaspoons dried ground thyme
  • 2 teaspoons garlic powder
  • 1 teaspoon dried ground oregano
  • 1 teaspoon dried ground basil
  • 1 teaspoon crushed red pepper flakes (or to taste)

ITALIAN SEASONED DIRECTIONS:

Follow the steps above for the plain crumbs, except before placing in the oven toss with the ingredients above.

You can create whatever seasoning suits you. I make a lot of Italian food, so this is my go to mix.

Store in an airtight container or zip lock bag in freezer for several months.

Focaccia – Don’t miss this!

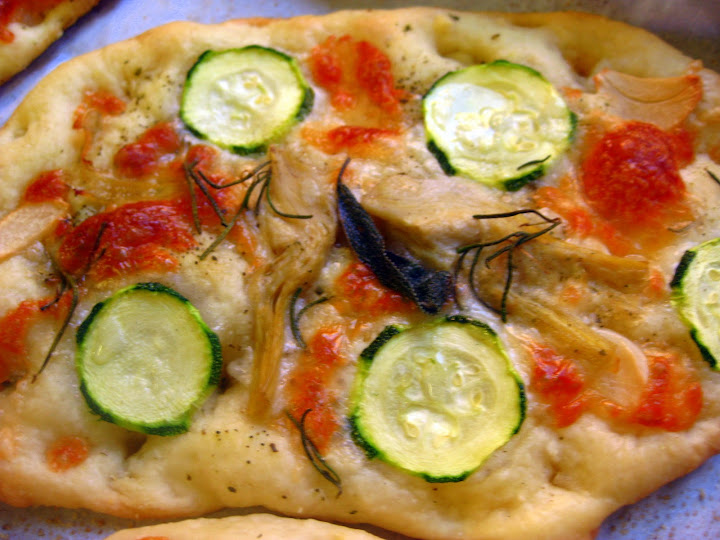
I have made this recipe a few times now and each time it just gets better since I get more comfortable with the whole dough making business. A baker, I AM NOT, N-K?! So..if I can do this ANYONE, can do this. I follow this dough recipe to the “T” and then add the other stuff to suit mine and my families taste. I found this recipe at this amazing blog…ready for the name?….The Barefoot Kitchen Witch! Love her name, love her blog, check her out and you’ll see why. While you are there tell her we sent ya over 😀

Ok, back to the Focaccia yumminess. I could eat these things as a meal in-and-of-itself, however to save face and not look like a total carb overload eater, I make this with either a veggie packed salad or delicious soup, like my Creamy Chicken Veggie & Rice Soup.

Let your heart and tummy guide you through this process of what to top it with. Your options are as vast as your imagination on this one, that is half the fun coming up with toppings and combinations. Just imagine yourself biting into a light warm crispy and soft doughy bite filled with your favorite toppings….now your talking!
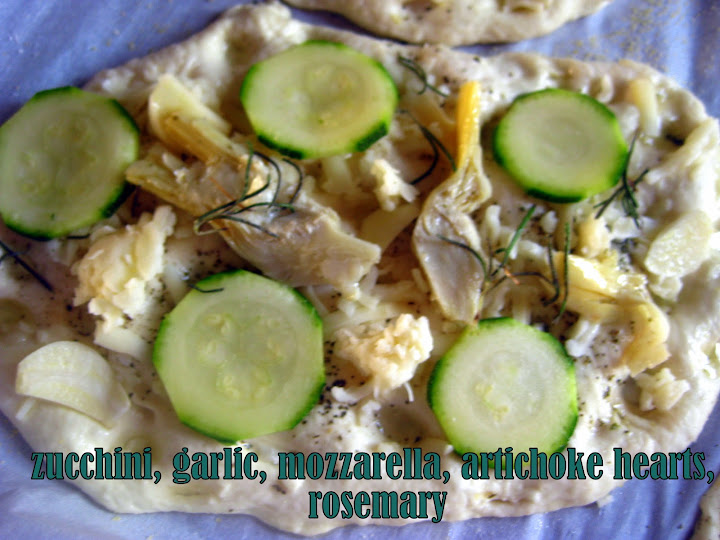
Take your time with the recipe, nurture it, follow it and enjoy the outcome when finished. I will guide you through a step by step process that will ensure complete success!

Things to know about this recipe:

  1. Kids love helping with this; let them dimple the dough, let them pick their own ingredients and let them top their own with what they picked!
  2. The dough is sticky; keep flour out until  you are done with all the handling of it
  3. Small kitchen? Make sure you have room for 2 sheet pans and a cutting board and a floured surface all at once.
  4. Use a kitchen aid (or whatever brand) stand up mixer for this, a hand held mixer will not work.
  5. If you want smaller portions, I have made this recipe into 18 focaccias, it is possible.
  6. Pre cut your parchment paper and set out on sheet pans ahead of time or during the rising process.

INGREDIENTS:

  • 2  1/2 tsp (1 pkg) active dry yeast or 1 small cake (18 grams) fresh yeast
  • 1  cup warm water
  • 1/2 cup milk (warmed in microwave for about 1 minute)
  • 2 T olive oil
  • 2 1/2 T lard, at room temperature (I used vegetable shortening)
  • 3 1/4 cups unbleached all-purpose flour
  • 1 1/2 tsp salt
  • Olive oil for brushing the tops
  • Salt for sprinkling the tops
  • Cornmeal for dusting the bottoms before baking
  • Toppings – thinly sliced vegetables, grilled or sautéed to intensify the flavor.  Garlic, Cheeses, Whatever sounds good.

DIRECTIONS:

Stir the yeast, water and milk in the bowl of a stand mixer; let stand until creamy, 10 minutes. 

Stir in the oil, and lard with the paddle. 

Add the flour and mix at low speed about 2 minutes. 

Change to the dough hook and knead 4 to 5 minutes. 

Add the salt and knead another 1 to 2 minutes.  The dough will climb up the collar of the hook, and you will have to stop several times to push it down.  The dough should be smooth, velvety, and softer than bread dough but firmer than croissant dough.

First Rise:

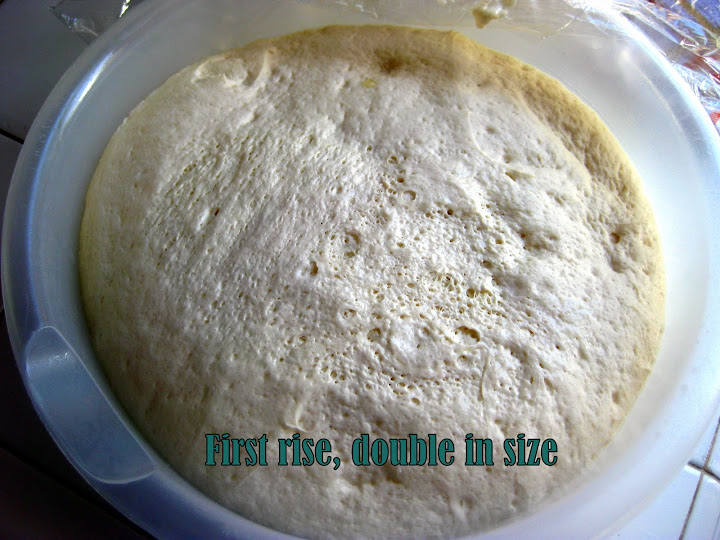
Place the dough in a lightly oiled bowl, cover tightly with plastic wrap (don’t forget to spray the plastic wrap), and let rise until doubled, 2 hours.
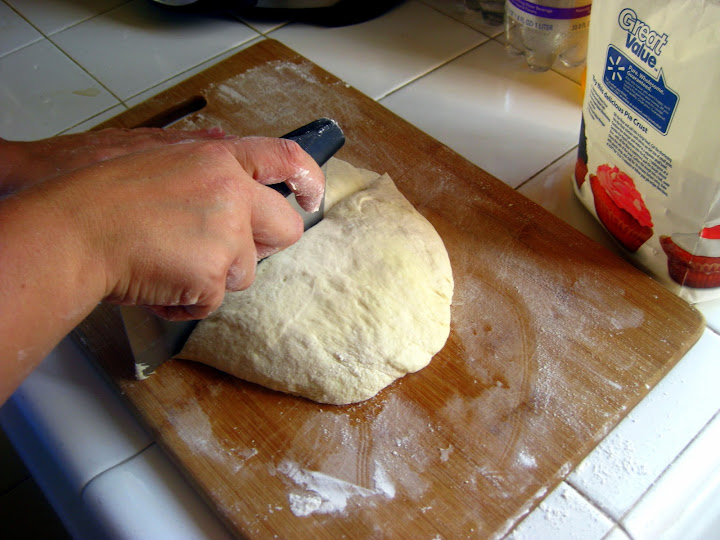
Cut the dough into 6 pieces (or however many you want to make, remember I made mine into 18 once) on a lightly floured surface and shape into balls. Let rest under a towel for 15 minutes.
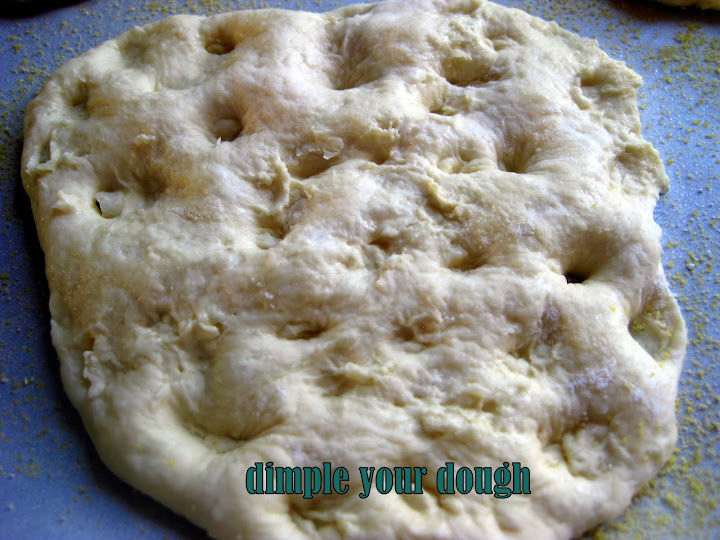
Dimple the dough balls (remember kids love this part, no matter what age!), spreading each into a circle, and let rest under a towel another 15 minutes. 
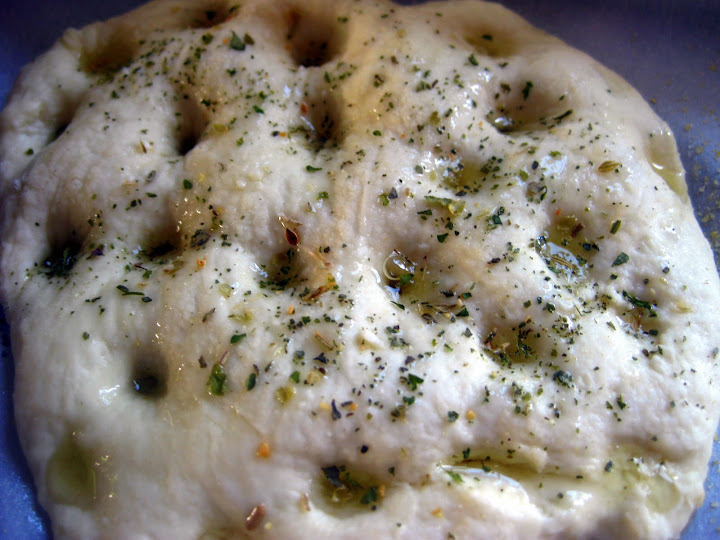
Dimple tops with oil and sprinkle lightly with salt alone or your seasoning. (Here I used basil and salt) Place the dough circles on parchment-lined or oiled baking sheets or baker’s peels sprinkled with cornmeal.
Second Rise:

Cover with a towel and let rise until doubled, about 1 hour.

Dimple the dough again with your fingertips, stretching it as you go.  Sprinkle with salt and brush with oil. 

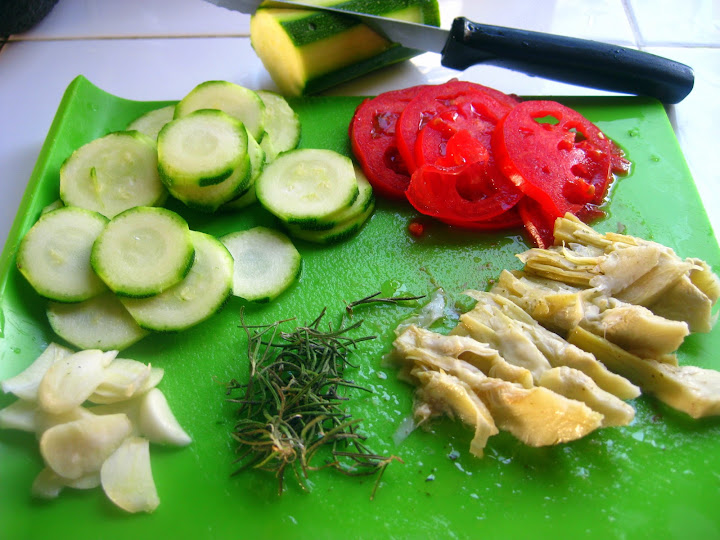
Mist water very lightly over the top to cover and trap the oil and then cover with the toppings of your choice.
Preheat the oven to 425 degrees F. at least 20 minutes before you plan to bake.  Bake 18 to 20 minutes.  Immediately brush the surfaces with oil.  Serve hot, or cool on racks to room temperature.

This recipe is being shown over at Thursday’s Treasures!!
Creamy Chicken Veggie and Rice Soup – Warm the Heart, Warm the Soul!

Don’t let the sunny picture fool you…well ok I’m not even going to go there. Living in California sure its fun in the sun. But when my favorite time of year comes, FALL, I am saddened that the weather is not cool enough to reflect that. I love making soup and bread and warm you up goodies, but when the temperature reaches 80 in November, well sometimes it just isn’t that easy to get my family to eat hot soup! Luckily in between these warm days are a few hit or miss cool and even rainy ones. Leaving me to explore the world of Fall cooking.

Today I made a creamy, warm, stick to your ribs with a hearty healthy kick soup. This soup is almost too hearty to have a second bowl…I did say ALMOST! Filled with vegetables for great nutrition and a little creaminess to round it out, you will surely want to accompany it with a carb filled side! For me I have been making this Focaccia Bread that is just delicious and pairs perfectly with any soup or is fabulous on its own. Take a weekend, get your ingredients together you will want to make both of these delights this weekend!

INGREDIENTS

  • 8 c. Low-Sodium Chicken Broth
  • 2 Stalks Celery, thinly sliced
  • 1 Red  Onion, diced
  • 1/2 c. Carrots, I used the shredded ones
  • 1 head of broccoli, washed and cut up in small pieces (reserve 1/2 of the florets)
  • 1 bunch of Asparagus, washed and trimmed; reserve the stems
  • 2 cloves Garlic, minced
  • 1 tsp. Dried Oregano
  • Extra Virgin Olive Oil
  • 2 tbsp. All Purpose Flour
  • 3/4 c. Cream of Chicken Soup (could substitute in heavy cream, I just had this left over so I wanted to use it)
  • 1/4 c. 2% Milk
  • 1/2 cup sharp cheddar cheese (optional)
  • Kosher Salt, to taste
  • 1/4 tsp. Fresh Ground Pepper
  • 3 cooked Chicken Breasts, diced

DIRECTIONS:

In a large stockpot, drizzle olive oil on the bottom and add your diced chicken. Season with salt/pepper and cook until browned and cooked through.

Remove from pot and add 1 tbs of olive oil, add; carrots, celery, onion, broccoli, stems of your asparagus and saute for 5 minutes.

*NOTE* Using the stems to the asparagus:

  1. Cut the very bottoms off, discard and do not use
  2. Bend the bottom of one the asparagus spears until it snaps, this will be your guide for cutting the rest of the bunch
  3. Cut the remaining spears and cut the stems into 1/2″ dices, add these to your stockpot.

Add flour and saute for 2 minutes to get the flour taste out of it.

Add chicken broth slowly stirring as you add to avoid clumps. Once all broth is incorporated, bring to a boil and then reduce heat to just at a boil for about 20 minutes, or until all veggies are super soft.

Remove from heat and using an immersion blender (these things ROCK!) start blending until you get the desired consistency you like.

Return pot to stove and reduce heat to low. Add rice stir to combine.

Take a microwave safe bowl and add your milk and cream of chicken soup and combine. Add cheese if using.

Add this to your stockpot along with your reserved chicken and simmer for about 30 minutes or until the rice is cooked through.

While simmering place your asparagus spears & broccoli florets in a microwave safe bowl and add about 2 tbs water. Cover with Saran wrap and cook for 1 minute. Immediately add to an ice bath to stop the cooking process.

When soup is finished garnish with a few of your steamed broccoli florets and asparagus spears.

Chicken Bacon Ranch Mac-N-Cheese – It’s not too late for dinner plans!

Nothing says comfort quite like home-made mac-n-cheese. I never could resist cheese nor the crunchy browned goodness on top of a casserole. Putting the two together is sheer bliss in my book. Besides the boxed mac-n-cheese is nowhere near what mac-n-cheese should be. I have never purchased powdered cheese so why would I use it in a meal for my kids? Last time I looked cheese was something that was fresh!

This is a great go to meal, it comes together quickly and the aroma of cheese and bacon fill your home with deliciousness. Once you bite into the crunchy bacon topped, oozy gooey cheesy pasta you will be digging in for more!

My kids ask for this at least once a week. I have to restrict them, so I make a second smaller batch that I freeze. Let me tell you the frozen one is almost better than the fresh. 

INGREDIENTS

  • 16  ounces  uncooked elbow macaroni
  • 1/2 lb sliced smoked bacon of your choice
  • 3 chicken breasts, skinned boned and diced into bite sized pieces
  • 3  tablespoon  butter
  • 3  tablespoon  all-purpose flour
  • 3 cups milk
  • 1/3  cup  condensed cream of chicken soup, undiluted
  • 2.5 cups shredded cheese, 1 cup jack, 1 cup pepper jack, 1/2 cup sharp cheddar (or whatever your favs are!)
  • 2 tbs powdered ranch
  • 1/2  teaspoon  salt
  • Cooking spray

DIRECTIONS

Cook pasta according to package directions until al dente.

Cook bacon in a large nonstick skillet over medium heat until crisp. I cut it up before cooking using my handy kitchen shears into bite sized pieces, then drain on paper towel and set aside. Reserving drippings in pan.

Add chicken to drippings in pan, sprinkle with pepper and a little salt (remember the bacon is salty) sauté for 10 minutes or until done.

Melt butter in a large saucepan over medium heat; sprinkle flour evenly into pan. Cook 2 minutes to get the flour taste out, stirring constantly with a whisk. Combine milk and soup in a bowl with a whisk; gradually add milk mixture to saucepan, stirring with a whisk, then add ranch powder.

Bring to a boil; cook 2 minutes or until thick. Remove from heat and add cheese. Once cheese is all melted into sauce, stir in pasta and most of the chicken and most of the bacon. (Reserve a little of each to sprinkle on top)

Preheat oven to 375 degrees F.

Spoon mixture into a greased 9 x 11″ glass baking dish, and an 8 x 8″ glass baking dish. (Or if you have a super large one use that. I freeze the small one for later.) Sprinkle evenly with reserved bacon and chicken.

Bake for 20-25 minutes or until heated through. DO NOT BROIL IN GLASS DISH, IT WILL BREAK ON YOU.

Serve with a side salad or vegetable to round out the meal.

My concoction of cheeses

Ready for the oven

Just out of the oven

Finished!