Chicken Bacon Ranch Mac-N-Cheese – It’s not too late for dinner plans!

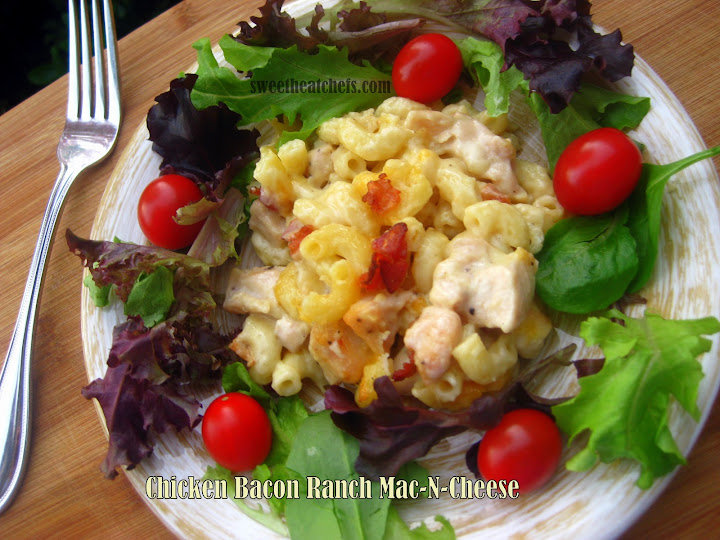
Nothing says comfort quite like home-made mac-n-cheese. I never could resist cheese nor the crunchy browned goodness on top of a casserole. Putting the two together is sheer bliss in my book. Besides the boxed mac-n-cheese is nowhere near what mac-n-cheese should be. I have never purchased powdered cheese so why would I use it in a meal for my kids? Last time I looked cheese was something that was fresh!

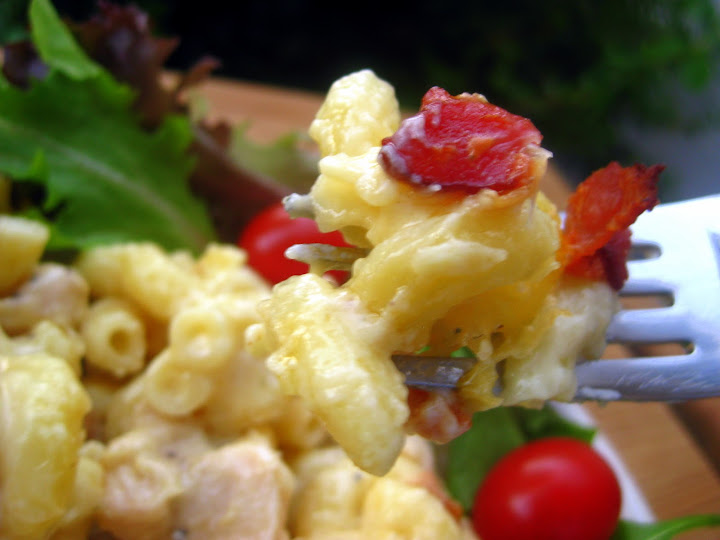
This is a great go to meal, it comes together quickly and the aroma of cheese and bacon fill your home with deliciousness. Once you bite into the crunchy bacon topped, oozy gooey cheesy pasta you will be digging in for more!

My kids ask for this at least once a week. I have to restrict them, so I make a second smaller batch that I freeze. Let me tell you the frozen one is almost better than the fresh. 

INGREDIENTS

  • 16  ounces  uncooked elbow macaroni
  • 1/2 lb sliced smoked bacon of your choice
  • 3 chicken breasts, skinned boned and diced into bite sized pieces
  • 3  tablespoon  butter
  • 3  tablespoon  all-purpose flour
  • 3 cups milk
  • 1/3  cup  condensed cream of chicken soup, undiluted
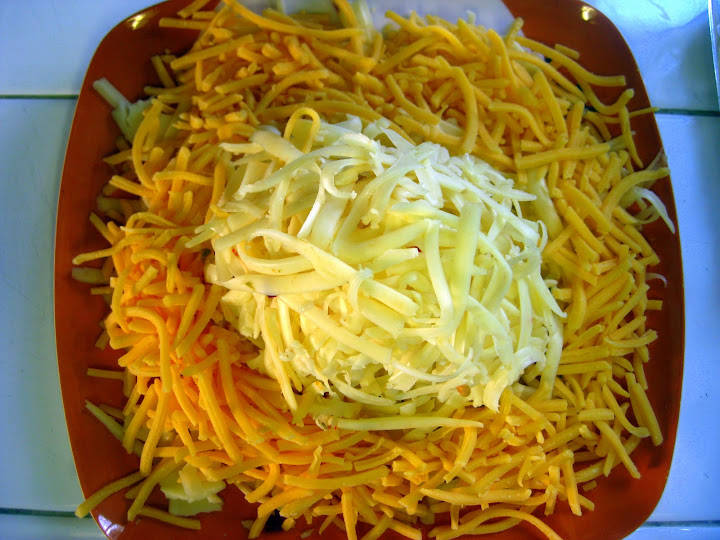
  • 2.5 cups shredded cheese, 1 cup jack, 1 cup pepper jack, 1/2 cup sharp cheddar (or whatever your favs are!)
  • 2 tbs powdered ranch
  • 1/2  teaspoon  salt
  • Cooking spray

DIRECTIONS

Cook pasta according to package directions until al dente.

Cook bacon in a large nonstick skillet over medium heat until crisp. I cut it up before cooking using my handy kitchen shears into bite sized pieces, then drain on paper towel and set aside. Reserving drippings in pan.

Add chicken to drippings in pan, sprinkle with pepper and a little salt (remember the bacon is salty) sauté for 10 minutes or until done.

Melt butter in a large saucepan over medium heat; sprinkle flour evenly into pan. Cook 2 minutes to get the flour taste out, stirring constantly with a whisk. Combine milk and soup in a bowl with a whisk; gradually add milk mixture to saucepan, stirring with a whisk, then add ranch powder.

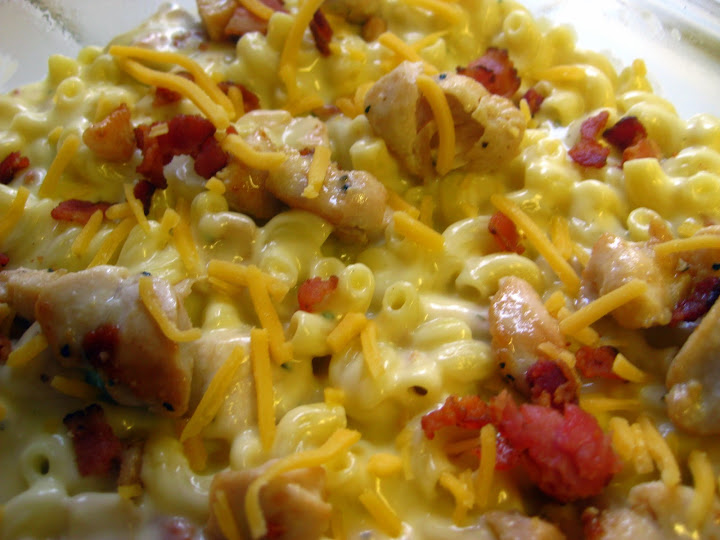
Bring to a boil; cook 2 minutes or until thick. Remove from heat and add cheese. Once cheese is all melted into sauce, stir in pasta and most of the chicken and most of the bacon. (Reserve a little of each to sprinkle on top)

Preheat oven to 375 degrees F.

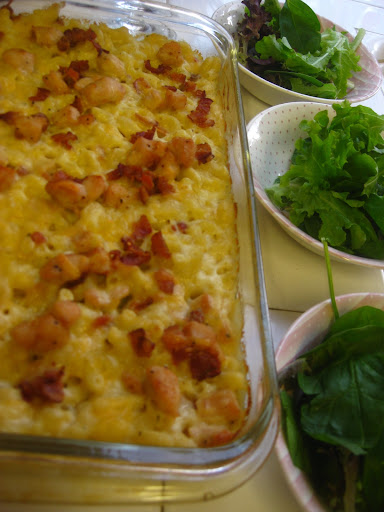
Spoon mixture into a greased 9 x 11″ glass baking dish, and an 8 x 8″ glass baking dish. (Or if you have a super large one use that. I freeze the small one for later.) Sprinkle evenly with reserved bacon and chicken.

Bake for 20-25 minutes or until heated through. DO NOT BROIL IN GLASS DISH, IT WILL BREAK ON YOU.

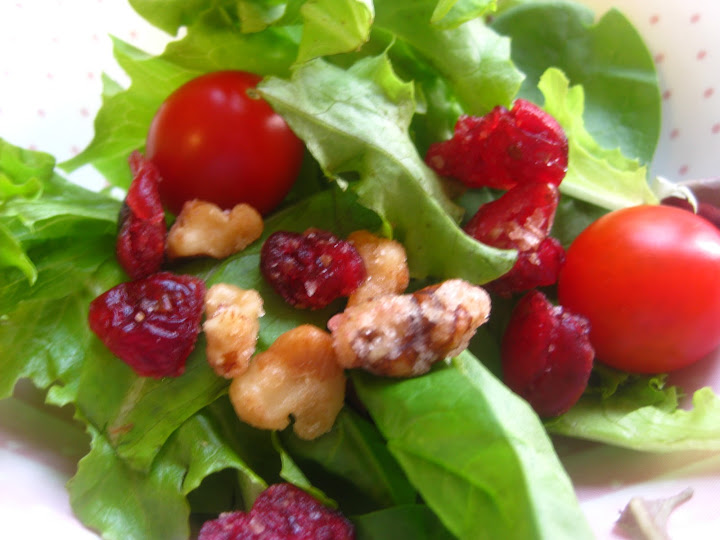
Serve with a side salad or vegetable to round out the meal.

My concoction of cheeses

Ready for the oven

Just out of the oven
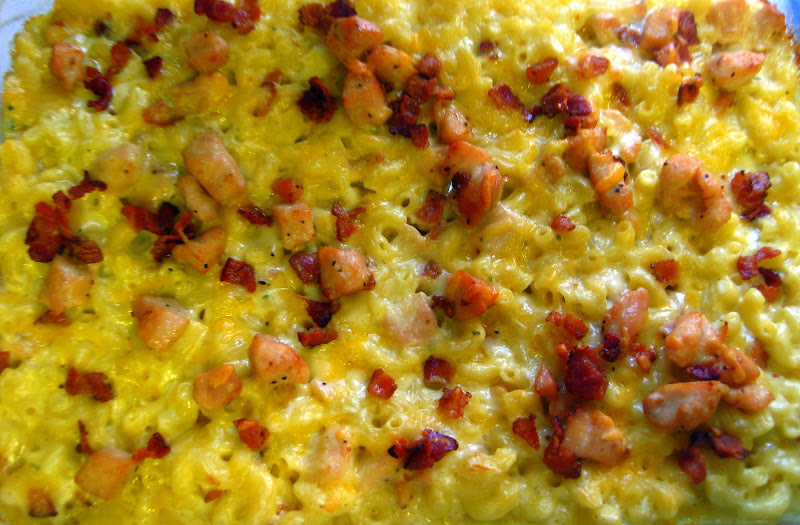
Finished!

7 Ingredient Breakfast Nests

Picture

INGREDIENTS
1 24 oz. bag of shredded hash browns, mostly thawed
2 tsp salt (or to taste)
1 tsp pepper (or to taste)
4 tbs olive oil
1/3 cup sharp shredded cheddar, jack cheese, or pepper jack cheese
12 pieces Bacon , slightly cooked
Extra shredded cheddar
Fresh chives
Large Muffin Tin 

DIRECTIONS Preheat oven to 425 degrees

  1. Open the hash brown bag and dump contents into a large bowl, mix in the salt, pepper, oil and 1/3 cup shredded cheese.
  2. Spray your large muffin tin cups with cooking spray or use paper liners.
  3. Divide mixture into the muffin tin cups
  4. Bake hash browns at 18 minutes or until desired crispiness. Keep in mind this is not the only baking they will go through so do not over cook.
  5. While the hash brown mixture is baking cook your bacon slices until close to being done, but still pliable, in the sense that they will bend without cracking and knowing that they will go in a hot oven to cook more. When finished drain fat on paper towel and set aside.
  6. Once the hash browns are finished, take them out, let cool and lower the temp of the oven to 400 degrees.
  7. Take your bacon 1 piece at a time and wrap around the hash brown. You can do this 1 of 2 ways. (1) remove the hash brown cup, place bacon around the cup and replace the hash brown; or (2) using a butter knife, gently separate the hash brown cup from the side of the muffin tin and place bacon strip around the cooked hash brown. 
  8. Next crack an egg into each of the cups, my kids like to pop the yolk on this part 😀
  9. Add more hash brown mixture to the top of the egg covering it entirely.
  10. Add a sprinkle of your extra cheese
  11. Bake at 400 degrees for an additional 15-20 minutes (or until the eggs are as firm as you like them).
  12. Slide a knife along the edges to remove from pan when cooled and garnish with fresh chives.


Picture

Large muffin tins with hash brown nests

Picture

Picture

Loving my mini herb garden, my chives inspired this yummy breakfast treat!

Picture

who doesn’t love bacon? Ok, vegetarians, but in our house bacon is a staple item! MMMMMM ZIZZLE….

Picture

Bacon wrapped around hash brown nests

Picture

this is the version of removing the hash brown nest, placing bacon in and then adding back the hash brown nest

Picture

Add egg, more hash browns, and more cheese to top, before going back in the oven.

Picture

I froze some strawberries a while back because no one was eating them. i didn’t want them to go bad and you can ALWAYS use them for something. I decided to use some of my leftover Friday baking, Banana Coconut Bread to go alongside this breakfast. I used a heart cookie cutter and cut out a heart shape and halved a strawberry and placed on top of the cut out!

Picture

After it cools a few minutes, remove from muffin tin

Picture

Garnish with fresh chives and serve with a glass of nice cold sparkling strawberry apple juice!


Stuffed Turkey Meatloaf

Picture

I am entering a contest in the The Mr. Food Test Kitchen for the ultimate weeknight meal…Since I hated meatloaf for so long, I thought I’d share my newly found love with everyone. Hope it wins!!

I am not a meatloaf fan, I am not sure my kids are either. I don’t make it that often to really know. I decided to try a new way of approaching how I made it. In previous attempts I changed different additives to the meatloaf, bread crumbs here and Worcestershire there, ketchup this time, tomato sauce the next. Nothing ever resonated enough for me to sit up and say HEY this is good…UNTIL…I decided to stuff a meatloaf. Yes you heard me, STUFF it, not in my mouth, but stuff the inside with goodies I knew my kids would eat and with some veggies that I am always trying to stuff down their throats! So anyway, this was the best meatloaf in the entire world, maybe I should have named it that? There were no leftovers and you won’t believe how easy it is to make. You could even have change-out ingredients to your own liking! Change out the cheeses, omit the spinach and use arugula, the possibilities are endless. I hope you enjoy this recipe as much as I did, this was a real accomplishment for me. although I wouldn’t say I HEART MEATLOAF, I would say, I HEART my stuffed turkey meatloaf! This is the only meatloaf that will ever be made in this household 😀

INGREDIENTS:

1 1/2 lb ground turkey 80% lean
1 lb cooked bacon, chopped + reserve 1 handful
2 cloves crushed minced garlic
2 tbsp oregano or Italian spice blend
1 egg
1 can tomato sauce
1/4 C bread crumbs
1 c. grated Romano cheese + 1/4 cup reserved
1 c. grated Parmesan  cheese + 1/4 cup reserved
2 c. loosely packed fresh spinach leaves
Salt/pepper to taste

DIRECTIONS:

  1. Heat oven to 350°F.
  2. Cook off bacon and drain fat on paper towel. When cool crumble into bite sized pieces.
  3. In large bowl, mix ground turkey, egg, 1/2 cup of the tomato sauce, bread crumbs, garlic, salt and pepper.
  4. Spray foil covering a baking sheet with non-stick cooking spray. Place turkey mixture onto baking sheet and form a rectangular shape.
  5. Sprinkle the bacon evenly over the meat mixture, pressing firmly into meat.
  6. Sprinkle cheeses evenly on top of bacon.
  7. Place the spinach leaves on top of cheese evenly.
  8. Starting at short end, start rolling up tightly, using foil to start the rolling process. You may need to tuck in spinach leaves as you roll. Seal ends when rolling is complete.
  9. Spread remaining pizza sauce over top, add the remainder of the cheese and any left over bacon. Bake for around 1 hour or until juices are clear or until thermometer inserted in meat loaf reads 160°F. Let stand 5 to 10 minutes before serving.
  10. Serve over mashed potatoes or rice.

Picture

Picture

Picture

oops, looks like i left a piece of garlic uncut, hope I get that bite!!

Picture

make sure to press the bacon into the meat

Picture

Picture

stuffed meatloaf

Picture

rolling meatloaf

Picture

top of the meatloaf

Picture

while it cools…STOP and get your drool on!

Picture

Light BLT Pasta

Picture

INGREDIENTS

1 pound short-cut pasta with lines ( i use the pasta made with veggies)
2 tablespoons extra virgin olive oil (EVOO)
1/2 lb. thick-cut good quality bacon, cut up in bits
1 leek, trimmed, cleaned and halved lengthwise and sliced in 1/2″ rings
1 shallot, peeled, and sliced in rings
3-4 cloves garlic, thinly sliced ( I use microplane)
Black pepper, to taste
1 tablespoon tomato paste
1/2 cup cooking sherry
1 pint cherry tomatoes
5 oz Philadelphia Cooking Creme, Italian Cheese and Herb flavor 1/3 less fat

 
DIRECTIONS

  1. Bring a large pot of water to a boil for the pasta, salt cooking water and cook pasta to al dente.
  2. Meanwhile, brown bacon in pan until crisp. Remove from the pan, drain on paper towel and reserve.
  3. Using 1 T of bacon fat, add the leeks and garlic and season with pepper. Stir until softened, then add the tomato paste and stir until well combined and thick.
  4. Add the cooking sherry and reduce sauce by half.
  5. Add the tomatoes and put a lid on the pot. Let the tomatoes burst, about 8-10 minutes. **See picture on what to do while you are waiting for cherry tomatoes to cook**
  6. Stir in the cheese and reduce heat to low stirring frequently until cheese is melted through.Reserve about 1/2 cup of the starchy cooking water just before draining pasta, then drain and add the pasta to the sauce.
  7. In a bowl add pasta and top with sauce, stir until well combined. If sauce is too thick add slowly reserved pasta water until desired consistency.
  8. Add the bacon in and toss.
  9. Serve in shallow bowls topped with left over cherry tomatoes and sprig of Rosemary.

Picture

Gorgeous bounty of tomatoes!

Picture

Picture

shallots

Picture

leeks and shallots

Picture

cooking sherry

Picture

tomatoes being added to vegetable mix

Picture

cover tomatoes and wait for them to burst open

Picture

enjoy a nice COLD drink while you wait for tomatoes

Picture

tomatoes after they burst

Picture

cheese added to pan

Picture

Harvest Meatloaf Cups

INGREDIENTS
1 teaspoon olive oil
1/2 pound ground beef
1/2 pound ground pork
1/4 cup onion, finely chopped
2 cloves garlic, minced
1/2 teaspoon salt
1/8 teaspoon pepper
1 tablespoon Hot Sauce
1.5 tablespoons Dijon mustard
4 springs of fresh thyme
1/4 cup flat-leaf parsley, chopped
1/4 cup Panko breadcrumbs (or saltines)
1/8 cup milk
1 large egg
1 large carrot peeled and grated
1 large zucchini grated
1/2 cup sharp shredded cheddar cheese
1 puff pastry sheet, defrosted

DIRECTIONS

  1. Preheat oven to 400 degrees.
  2. Put olive oil into a large skillet and heat it up over medium heat. Add your onion, cook for 2-3 minutes, add garlic and cook until fragrant, another 30 seconds. Set it aside. Now turn the heat up to medium high, and add ground beef and pork. Cook until just about browned, set aside too cool.
  3. In a large bowl, combine cooled onion, garlic, ground beef and pork with all the rest of the ingredients from salt down to the 1/2 cup of shredded cheddar. You can use a spoon to combine everything, I use my hands, it mixes so much easier.
  4. Now take a muffin pan, grease it and set aside. *Don’t forget to grease the pan* Take your thawed puff pastry sheet cutting it in thirds length-wise along the folds. Cut those three long pieces into three smaller pieces in the opposite direction, you’ll end up with 9 pieces.
  5. Place each of those rectangles of pastry dough into the muffin tins, letting the corners hang over each tin. Now spoon about a tablespoon and a half of your meat mixture into each. Go back and continue to fill until the mixture is all set.
  6. Add a sprinkling of panko breadcrumbs and cheese to top.
  7. Pop into the oven and bake for 15-17 minutes until your pastry is nicely browned.
  8. Let cool for 1-2 minutes then loosen with a rubber tip spatula and remove from tins.

NOTES

**DON’T FORGET TO GREASE THE PAN**
I would add bacon pieces to the mixture next time


Picture

Picture

Picture

Picture

Colorful Bacon & Chive Deviled Eggs

INGREDIENTS

1 dozen eggs
1/2 c. Mayonnaise
2 T. Dijon Mustard
1/2 lb. bacon or a bag of bacon bits (do not use imitation bacon bits)
Chives 
Fresh Cracked Pepper (to your liking)
Dash of hot sauce (my secret ingredient!)
1 T. White Vinegar or Cider Vinegar per color of food coloring you are using
1/2 c. Boiling Water per color you useFood Coloring Ramekins or cups

DIRECTIONS

  1. Cut bacon into bits and fry up. When done set aside to drain fat on paper towel. 
  2. Put eggs in a pot, cover with water and boil. Once eggs are boiling turn down to a simmer for about 10-15 minutes. When done, run cold water over eggs until cooled. While eggs are cooling get together your food coloring, vinegar, cups/ramekins and start boiling your water. 
  3. For every food color you choose, you will need 1/2 cup of boiling water for it. Add the vinegar to the cups/ramekins and 2-4 drops of food coloring in each one. When water is done boiling add the water to cups/ramekins.
  4. Remove shells of eggs and rinse to make sure no egg shells are left on. On a cutting board slice each egg in half and remove yolks placing them in a medium sized bowl. 
  5. Once all the yolks are removed set the bowl aside and add the whites of the eggs to your food coloring. While the eggs are soaking up their coloring, lay out paper towels to dry and drain the eggs. I generally only use 3 layers of paper towels. There is no set time on the length of time the eggs are needed to stay in the water, it is until you are satisfied with the color. 
  6. Meanwhile use fork to mash the yolks of the eggs until a crumbly consistency appears. Then add mayonnaise until creamy. You can add more or less mayonnaise depending on your taste and you can use low fat or non fat mayonnaise as well, merely up to you. Next add the Dijon mustard and pepper and stir until combined.
  7. I use a Ziploc baggie to re-distribute the egg yolk back into the egg. So next step is to take the egg yolk mixture and place into a small quart sized Ziploc baggie. I get all the air out and refrigerate until I am ready to use. Refrigerating it makes it easier to use in my opinion once it firms up a bit. 
  8. After all eggs are colored and dried, place neatly on a pretty serving platter, get your Ziploc baggie out and carefully cut the very corner tip off. The smaller the cut the better, you will have more control on how you fill the egg and if it is too small you can always cut a little more. If you cut too much it will just run everywhere. 
  9. Fill the eggs, you will have more than enough to fill all eggs and sometimes I will have to go back and add more once they all are filled. Once you are happy with the amount of filling, get your bacon bits and add to the top of the deviled egg, then add a few chives. 
  10. Next watch your family, guests and friends smile from ear to ear when they see your colorful creations!!

HINT: You don’t want to overpower the deviled egg with the bacon and chives. This is just an additive to make deviled eggs “funner” I add a few bacon bits and a few chives, but you may like more or less.

Picture

Picture

 Picture

Picture

Picture

Picture

For the bottom 4 eggs I colored the whole egg prior to cutting it and removing the egg yolk, this creates a white border on the top. The top 2 I cut in half put in the color, then added 1 drop of color while they sat in the mixture, this created a marbled effect.